


How to create a custom reusable code snippet in 6 minutes (using VSCode)


Introduction
If Microsoft visual studio code is your goto editor when coding, you should master how to use it since you will be spending most of your time working with it while coding, and one way to do that is to learn "how to create a custom reusable code snippet using it".
Without further ado, let's dive into the purpose of the article.
Step 1: Launch vscode and open the Command Palette
Press F1 or Control + Shift + P - Windows Users Press F1 or Command + Shift + P - Mac Users
An input box will open, type "configure user snippets" and press enter

Step 2: Select the language you want to create a snippet for.
Note: If you select JavaScript, you will only be able to use the custom snippet in a javascript file. Any file that ends with .js. If you want the custom snippet to be global (I.e, you can use it across all files), you will select "New global snippet file" and then you will give the global snippet a name and press enter. I'll be selecting javascriptreact (.jsx) for the essence of this tutorial.

Step 3: Create the snippet you want
Before we start creating a snippet. I want to briefly talk about three important concepts you will be using 100% of the time when you are creating a reusable code snippet.
- Prefix
- Body
- Description
Prefix
The prefix is what you type to trigger the snippet.
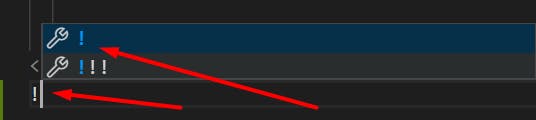
I.e Remember "!" or "HTML" we normally use to generate HTML backbone code anytime we want to create HTML? That's basically a prefix.
The prefix takes in a string as a value.
Example:
"prefix": "lg"
Body
The body is the code snippets that show when you type the prefix (keyword) and press enter.
The body takes in an array as a value.
Example:
"body": ["console.log('$1')",
         "$2",
         "${3:label}",
         "${4:respond}",
         "$0"
        ]
$0, $1 and $2 are called variables.
$1 means where you want to focus the cursor immediately the custom snippet displays. A tab will move the cursor straight to $2.
${3:label} and ${4:respond} are placeholders, by default label would be shown. In this case ${4:respond}, respond will be shown. If you use the same variable in different places. Let's say you used $1 twice while creating the body, a multiple cursors will be created.
Description
The description is the text that shows when you type the prefix.
The description takes in a string as a value.
Example:
"description": "It logs console.log to the screen as well as label and respond placeholder"
Back to creating our custom code snippet. As soon as you finish step 2, a JSON file will automatically be opened/created for you. If you chose HTML in step 2, html.json would be created, if you chose JavaScript, you will see Javascript.json. I chose javascriptreact so I will have javascriptreact.json created for me. Thanks to vscode good documentation, we have few comments to help us out. Reading the comments will make you understand the three concepts I discussed earlier a lot better now.
{
    // Place your snippets for javascriptreact here. Each snippet is defined under a snippet name and has a prefix, body and
    // description. The prefix is what is used to trigger the snippet and the body will be expanded and inserted. Possible variables are:
    // $1, $2 for tab stops, $0 for the final cursor position, and ${1:label}, ${2:another} for placeholders. Placeholders with the
    // same ids are connected.
    // Example:
    // "Print to console": {
    //     "prefix": "log",
    //     "body": [
    //         "console.log('$1');",
    //         "$2"
    //     ],
    //     "description": "Log output to console"
    // }
}
Now that you understand these 3 important concepts, it should be relativity easy to create your very first custom code snippet on your own.
As promised earlier, we will create a javascriptreact snippet together. I will delete everything inside the javascriptreact.json and create an empty object.
{

}
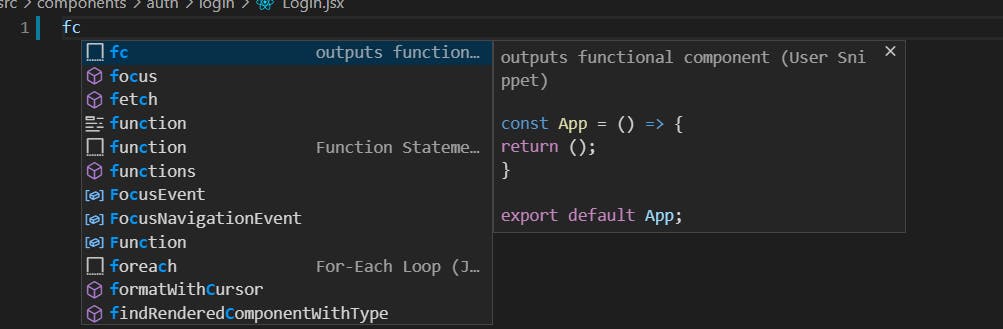
"Function component" is going to be the name of the snippet we will be creating together.
{
   "function component": {
   }
}
Note: The name is different from the prefix. The name takes in an object as the value. In this object, this is where we'll define the key-value pairs (I.e prefix, body, and description).
Let start with prefix, I'll use "fc" as the value - short for functional component, remember this is what triggers the snippet?
{
   "function component": {
       "prefix": "fc"
   }
}
Moving on to the body, I'll use
[
 "const ${1:App} = () => { ",
 "return ();",
 "}",
 "", // creates empty line
 "export default ${1:App};"
]
Remember the body takes in an array as value?
{
   "function component": {
       "prefix": "fc",
       "body": [
                 "const ${1:App} = () => { ",
                   "return ();",
                 "}",
                 "", // creates empty line
                 "export default ${1:App};"
               ]
   }
}
For the description, I will use "outputs functional component" as the value.
Final code
{
   "function component": {
       "prefix": "fc",
       "body": [
                 "const ${1:App} = () => { ",
                   "return (${2});", // position the cursor right here when I press tab
                 "}",
                 "", // creates an empty line
                 "export default ${1:App};"
               ],
        "description": "outputs functional component"

   }
}
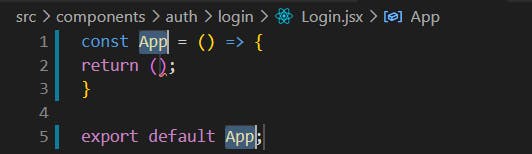
Let us see it in action:
Conclusion
When you find yourself repeating the same code over and over again. You should consider creating a reusable code snippet to keep you efficient. I hope you find the article interesting 🎉🎉🎉. If you have any questions. Please drop a comment. Thanks for reading 😉